Instal Mikrotik Menggunakan Flashdisk
пятница 01 марта admin 22
Instal Mikrotik Menggunakan Flashdisk Rating: 4,9/5 9386 votes
How do I install mikrotik??? It is very easy man, even in doing only in a few minutes only,, please follow the tutorial below: First,,you must download the iso file of Mikrotik router OS from mikrotik.com,Then write iso image file on CD,put in cdrom and turn on: Press 'a' key for select all and then press 'i', Answer 'n' to first question and 'y' to second installation complete, remove cd from cdrom and press 'Enter' after rebooting type 'admin' as login and no password.
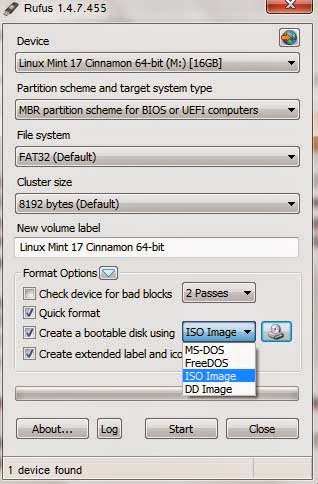
Kecuali mikrotik digunakan untuk keperluan beban yang besar (network yang kompleks, routing yang rumit) sebaiknya menggunakan spesifikasi yang cukup memadai. Cara menggunakan Rufus. Install Mikrotik Di. Catatan tentang cara memperbaiki flashdisk yang rusak ini saya tulis untuk melengkapi postingan sebelumnya. Instal Mikrotik Menggunakan. Tulisan ini berisi panduan dan langkah-langkah untuk meng-update BIOS ASUS dengan mudah dan aman menggunakan fitur ASUS EZ Flash. Biasanya flashdisk dipakai untuk instal ulang komputer dll.
In my previous posting, I also have to write a tutorial on and, many are still confused in the post because I do not use sreenshot. This time I try to make a tutorial with the same ease the process works. Download the software in need: 1.
Follow this step PART 1 - Formatting 1. Flash memory input / pendrive in usb port 2.
Ekstract all software to a folder on your hard drive directory, for example, in drive D, rename the folder, for example USB. Use WinZip or winrar for the ekstract. 3.Copy PE2USB.exe to folder USB_PREP8. Double click the file usb_prep8.cmd is in the folder USB_PREP8. So windows will appear on your monitor as a picture Press any keyboard key to continue. (Just follow the instructions), Window PE2USB will appear on your monitor. You do not need to change anything.
Click Start button, then press Yes After formated is complete, close the windows PEtoUSB, Remember! Only PEtoUSB windows, do not close the Command Prompt window. Comand it will appear like the image below Press any keyboard key to continue. (Just follow the instructions), Window PE2USB will appear on your monitor. You do not need to change anything.

4.Insert your Windows XP CD - Press 1 to select the drive where the windows installation files are located, (Change XP Setup Source Path, currently) A window will appear and select the drive containing your Windows XP setup CD. For example, in E, click there, ok - Select a menu number 3) Change Target USB-Drive Letter, currently Type the drive letter that contains your USB Flash Disk. In my example is drive F: - Select number 4, Make New TempImage with XP LocalSource and Copy to USB-Drive - Press Y to start the formatting - Press any key to continue the process Press yes to copy temporary files to usb yes Yes Press any key to end all the process. PART II - Installation 1. Before you begin the installation make sure that the booting sequence is set up so that your first boot from a USB Flash Disk.
How to setup the BIOS menu, turn on the computer / laptop, press F2 after computer / laptop is turn on 2. After entering the BIOS menu select the 'boot order' 3. On Boot Order you can select the boot sequence that is required is: 1. USB Hard Drive / Flash Drive, sequence number 2 to the other but usually content with your DVD / CD Drive. Click Save and Exit, the computer will restart. If all goes smoothly, at the time the computer will turn back to boot from a USB Flash Drive and you will show the options menu 6.
Ncomputing x550 windows 7 driver. Select the [TXT Mode Setup Windows XP, Never Unplug USB Drive Until After logon]. IMPORTANT: Do not pull out/unplug the USB Flash Drive to a Windows XP installation is completed entirely. Windows XP setup will start. Do as if you are using exactly CD, just follow the instructions. After the setup finished copying files to your hard drive, setup will make the computer restart. IMPORTANT: Select the [GUI Mode Setup Windows XP, Continue Setup + Start XP].
Windows Setup will continue to use the display setup GUI (Graphical User Interface) while copying from a USB Flash Drive. Continue installation as usual. If you are finished you can pull unplug the USB Flash Drive. Have you experienced problems while running applications Microsof office 2003? Each run or open exel document format like xls, and so will always show the dialog box installer Missing FILE SKU011.CAB. The solution can use the Office CD installer, select the repair, you can also solve them through the registry.